


 >
>
Diarsipkan di bawah: efek foto — jeprie @ 9:16 am

Semua TV kecuali HDTV memiliki garis-garis kecil di layarnya. Yang akan kita lakukan di sini menambahkan efek itu ke dalam foto. Efek ini membuat foto terkesan high-tech, setidaknya itu yang saya peroleh.
[All TV, except HDTV, have a thin lines on their screen. What we'll do here is add those effect to a photo. This efek create a high tech look, at least thats what i get.]
1. Langkah pertama kita adalah membuat pola garis-garis. Caranya dengan membuat file baru (ctrl+N) lalu isikan ukurannya 4×4 pixel.
[First step is creating the line pattern. Create a new file (ctrl+N) sized 4x4 pixel.]

2. Menggunakan tool zoom perbesar tampilan gambar hingga maksimal (1600% di CS2 dan 3200% di versi lebih baru). Saya juga menampilkan grid di layar sebagai panduan dengan klik View|Show|Grid.
[Max the view with zoom tool (1600% in CS2 and 3200% in newer version). I also show the grid as a guide by clicking View|Show|Grid.]

3. Dengan tool marquee persegi seleksi bagian atas gambar.
[With a reactangular marquee tool select top portion of your photo.]
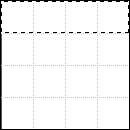
4. Isi dengan hitam.
[Fill it with black.]

5. Seleksi semua bagian kanvas dengan menekan ctrl+A.
[Select all canvas with ctrl+A.]
6. Klik Edit|Define Pattern. Perintah ini untuk mendefinisikan gambar sebagai pola di Photoshop. Di kotak dialog Pattern Name isikan nama pola lalu klik OK. File pola sudah tidak kita butuhkan lagi. Tutup saja, tidak perlu disimpan.
[Click Edit|Define Pattern. This command will define the pictures as a pattern in Photoshop. In the next dialog box fill the pattern name and click OK. We no longer need the pattern file. Close it, you dont have to save it.]

7. Buka gambar yang ingin diberi efek scanline.
[Open photo.]

8. Buat layer baru.
[Create new layer.]

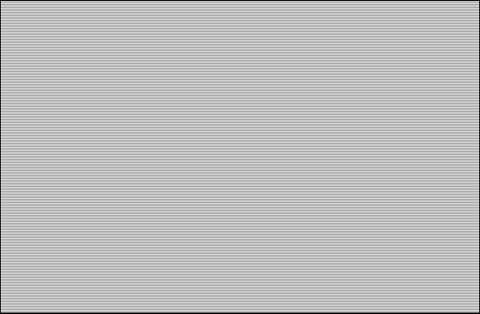
9. Klik Edit|Fill. Di bagian Use pilih Pattern dan di pilihan di bawahnya pilih pola garis-garis yang tadi kita buat.
[Click Edit|Fill. In Use choose Pattern and from the drop down box pick the pattern we just created.]

10. Hasilnya bakal seperti ini.
[And this is the result.]
11. Dan di sini kuncinya. Ubah blending mode layer ke Overlay lalu turunkan opacity-nya. Nilai opacity bisa berbeda tergantung selera Anda sendiri.
[And this is the key concept. Change blend mode to Overlay and reduce the opacity. The Opacity value may differ depend on your taste.]

12. Dan hasilnya seperti di bawah.
[And here's the end result.]

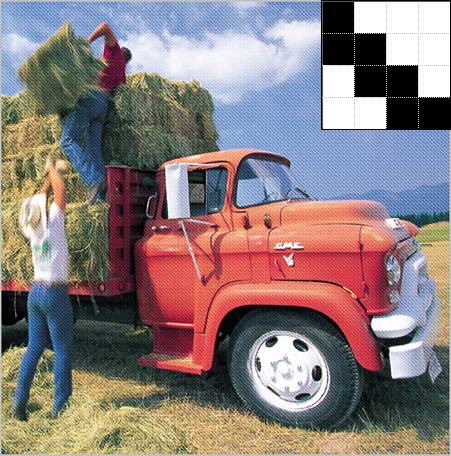
13. Tentu saja, saya mendorong Anda untuk terus bereksperimen. Gambar di bawah saya buat dengan bentuk pola seperti di pojok atas. Saya sarankan juga untuk mencoba blending mode lain seperti Multiply atau Screen.
[Off course I encourage you to keep experiment. Pic below I create with pattern on top corner. I also suggest you to try other blend mode such as Multiply or Screen.]
0 komentar:
Posting Komentar